


Select the Connect button below. If your browser does not support web serial, you will see a warning instead of a button.
Growing Fresh Produce with Rise Garden Hydroponics
Growing fresh produce with hydroponics has been a game-changer for many people, especially those who live in urban areas or have limited space. Hydroponics allows you to grow plants without soil, which means you don’t have to worry about soil-borne pests or diseases. Instead, you can provide your plants with all the nutrients they need through a nutrient solution that is added to the water.
One hydroponic system that I have been using with great success is the Rise Garden. This system is designed to make hydroponics gardening easy and accessible for everyone. It comes with everything you need to get started, including the grow lights, water pump, and nutrient solution. All you have to do is set it up, add water and the nutrient solution, and start planting.
Currently, I have six different plants growing in my Rise Garden: cilantro, green beans, cherry tomatoes, sweet peppers, mini cucumbers, and rainbow chard. The cilantro is growing extremely well, and I have more than I know what to do with. It’s great to have fresh cilantro on hand for all my cooking needs.
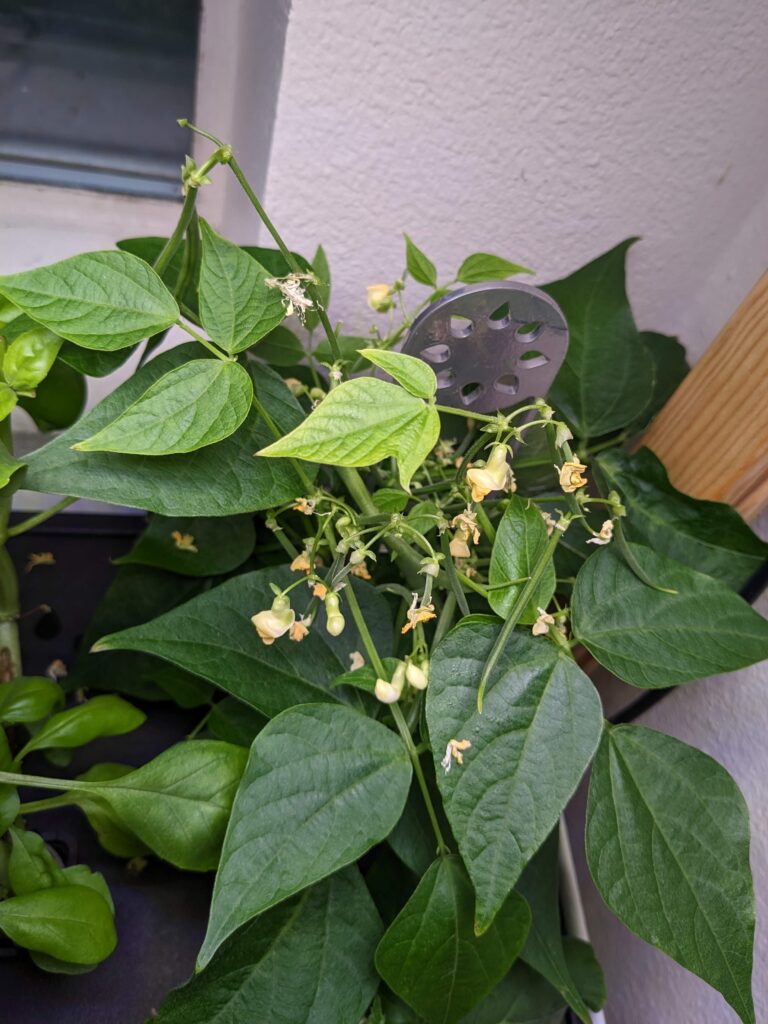
The green beans are also doing really well, and I can see many beans now showing up on the plant. The cherry tomato plant has so many flowers on it, and I am seeing the first of these flowers starting to go to fruit. It won’t be long before I am enjoying fresh cherry tomatoes in my salads.
My sweet pepper plant is starting to produce its first flowers, and I am looking forward to having some fresh peppers to use in my cooking. The new mini cucumber plant is also starting to grow quite well, and I am excited to see how it does.
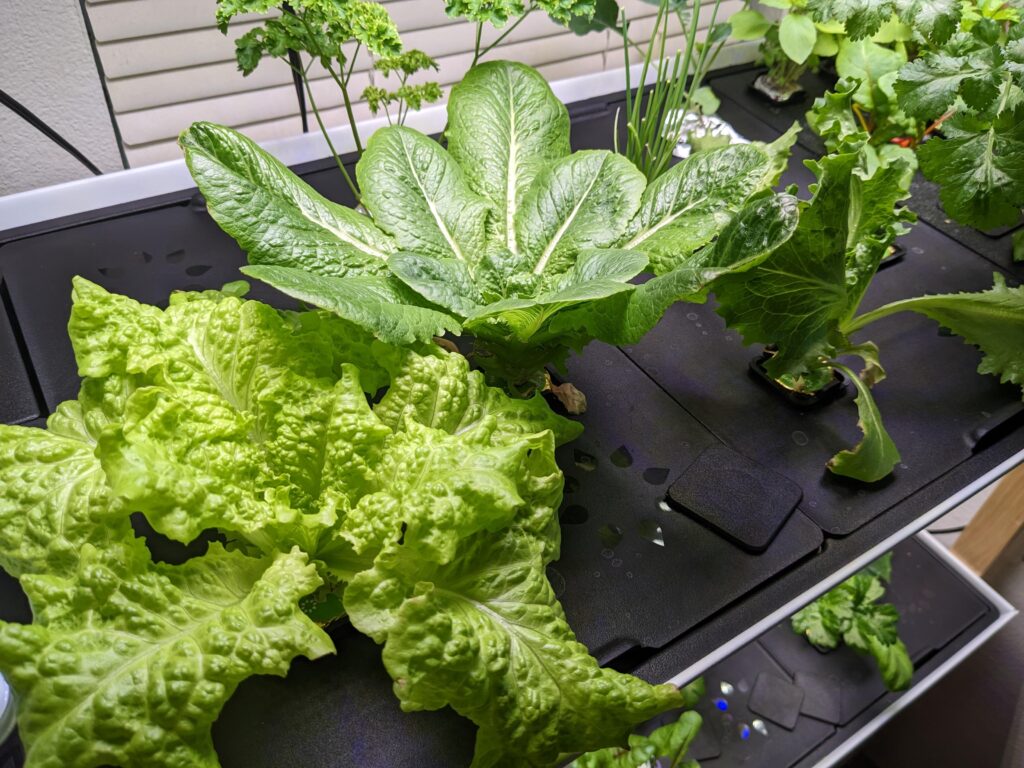
One of the best things about the Rise Garden is that it is so customizable. I recently added a second layer to my garden to grow more leafy greens, and it has been a great addition. Now, I can grow even more fresh produce in the same space.
The newly planted rainbow chard is coming up quite nicely, and I am excited to see how it does in the coming weeks. I can’t wait to harvest it and use it in some delicious recipes.
Hydroponics gardening with the Rise Garden has been a great experience. It is so easy to use, and it’s great to be able to grow fresh produce right in my own home. If you’re interested in hydroponics gardening, I highly recommend giving the Rise Garden a try. It’s a great way to grow fresh produce, even if you don’t have a lot of space.


Installing LEDfx Windows
To get started on Windows it is highly recommended that you use Anaconda to make installation of Cython components easier.
Install Microsoft Visual Studio
https://visualstudio.microsoft.com/downloads/
Start Anaconda
Once open, start a terminal session and run the following:
conda create -n ledfx
conda activate ledfx
Install LedFx and all the dependencies using pip and the conda package manager
conda config --add channels conda-forge
conda install aubio portaudio pywin32
pip install pipwin
pipwin install pyaudio
pip install ledfx
Launch LedFx (with the ‘open-ui’ option to launch the browser):
ledfx --open-ui
Trubleshooting:
Load a text file from the SD card for the Adafruit PyPortal.
This is some basic code that will print a list of files on the SD card and load a given text files contents. Then it converts the JSON text into a dictionary that makes it easy to list out and display values.
import time
import json

import os
import board
from adafruit_pyportal import PyPortal

# Create the PyPortal object
pyportal = PyPortal(status_neopixel=board.NEOPIXEL)

# Default location to look is in internal memory
FILE_DIRECTORY = "/sd"

RECIPE_FILE = "Cookies"

def print_directory(path, tabs=0):
    for file in os.listdir(path):
        stats = os.stat(path + "/" + file)
        filesize = stats[6]
        isdir = stats[0] & 0x4000

        if filesize < 1000:
            sizestr = str(filesize) + " by"
        elif filesize < 1000000:
            sizestr = "%0.1f KB" % (filesize / 1000)
        else:
            sizestr = "%0.1f MB" % (filesize / 1000000)

        prettyprintname = ""
        for _ in range(tabs):
            prettyprintname += "   "
        prettyprintname += file
        if isdir:
            prettyprintname += "/"
        print('{0:<20} Size: {1:>6}'.format(prettyprintname, sizestr))

        # recursively print directory contents
        if isdir:
            print_directory(path + "/" + file, tabs + 1)

try:
    print_directory(FILE_DIRECTORY)
except OSError as error:
    raise Exception("No files found on flash or SD Card")

try:
    with open("/sd/" + RECIPE_FILE + ".txt", "r") as fp:
        x = fp.read()
        # parse x:
        y = json.loads(x)
        ingredients = y["ingredients"]
        for i in ingredients:
            print('{} - {}'.format(i.get("quantity"), i.get("ingredient")))

except OSError as e:
    raise Exception("Could not read text file.")
On the MicroSD card there is a file named Cookies.txt that is made up of the following JSON.
{
   "ingredients":[
      {
         "quantity":"1 cup",
         "ingredient":"butter, softened"
      },
      {
         "quantity":"1 cup",
         "ingredient":"white sugar"
      },
      {
         "quantity":"1 cup",
         "ingredient":"packed brown sugar"
      },
      {
         "quantity":"Two",
         "ingredient":"eggs"
      },
      {
         "quantity":"2 tsp",
         "ingredient":"vanilla extract"
      },
      {
         "quantity":"1 tsp",
         "ingredient":"baking soda"
      },
      {
         "quantity":"2 tsp",
         "ingredient":"hot water"
      },
      {
         "quantity":"1/2 tsp",
         "ingredient":"salt"
      },
      {
         "quantity":"3 cups",
         "ingredient":"all-purpose flour"
      },
      {
         "quantity":"2 cups",
         "ingredient":"semisweet chocolate chips"
      },
      {
         "quantity":"1 cup",
         "ingredient":"chopped walnuts"
      }
   ]
}
This should result in the following output:
code.py output:
ESP firmware: bytearray(b'1.2.2\x00')
Set background to  0
Coleslaw Dressing.txt Size: 426 by
Bread Dough.txt      Size: 426 by
Pancakes.txt         Size: 426 by
Cookies.txt          Size: 1.0 KB
1 cup - butter, softened
1 cup - white sugar
1 cup - packed brown sugar
Two - eggs
2 tsp - vanilla extract
1 tsp - baking soda
2 tsp - hot water
1/2 tsp - salt
3 cups - all-purpose flour
2 cups - semisweet chocolate chips
1 cup - chopped walnutsJust a little Garden UI
This week I made a bit of progress with my garden monitoring system and figured out how to add a bunch of sensors connected to an ESP8266 that sends updates to my MQTT server. The hardwear is still being finished, but basically I am using four I2C expanders to add 16 Analog inputs to the NodeMCU along with a few other sensors attached to digital pins. This is all solar powered and I just got a controllable watering system that is working well. I will cover all of that once I have my system up and running.
Today I have been playing around with Home Assistant to make the user interface that I will use to help figure out and test automations later.
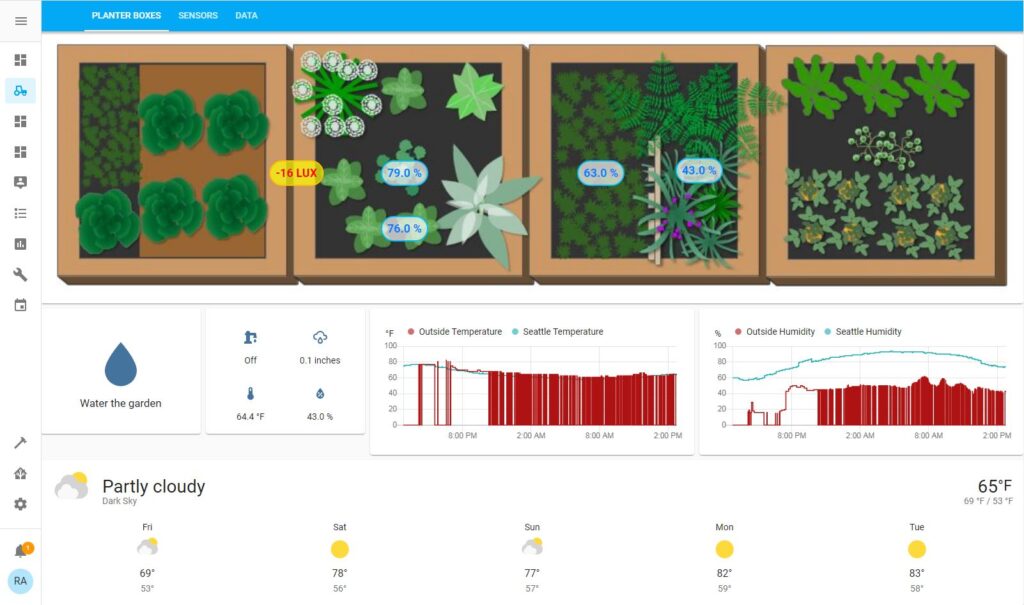
The first tab is a basic overview of the planter boxes with sensor data displayed over the aria that the actual sensor is placed. This also has a button to run a script that pulses water to the garden boxes so that the soil soaks up the water and a switch that lets you manually control the water pump. Though the pump switch is just for my testing because if you just turn the pump on it tends to flood the boxes that lets a bunch of water dripping out from the bottom and it is better for the script to pulse water over time. After that there is a graph with local weather report data along with data from my DHT11 sensor and the forecast for the week.
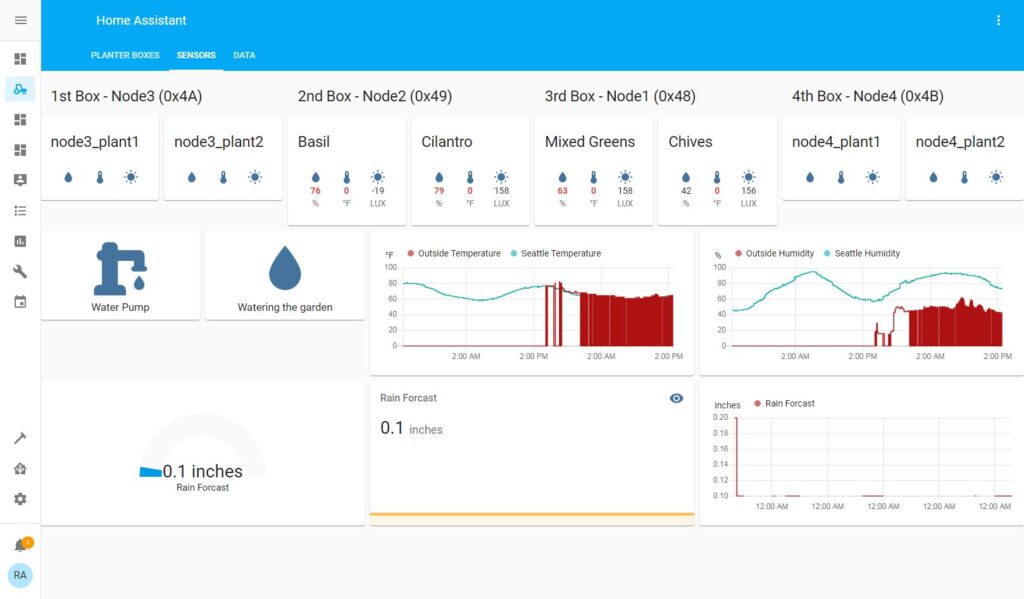
The Sensors tab shows each of the sensor readings using the Plant Status cards for Lovelace so that I can set alert triggers later for things like low water levels, freezing temperatures, or over exposure to sunlight. This tab also shows predicted rainfall for the day in inches. This information will be used to tell the system if it needs to water the garden or let nature do its thing.
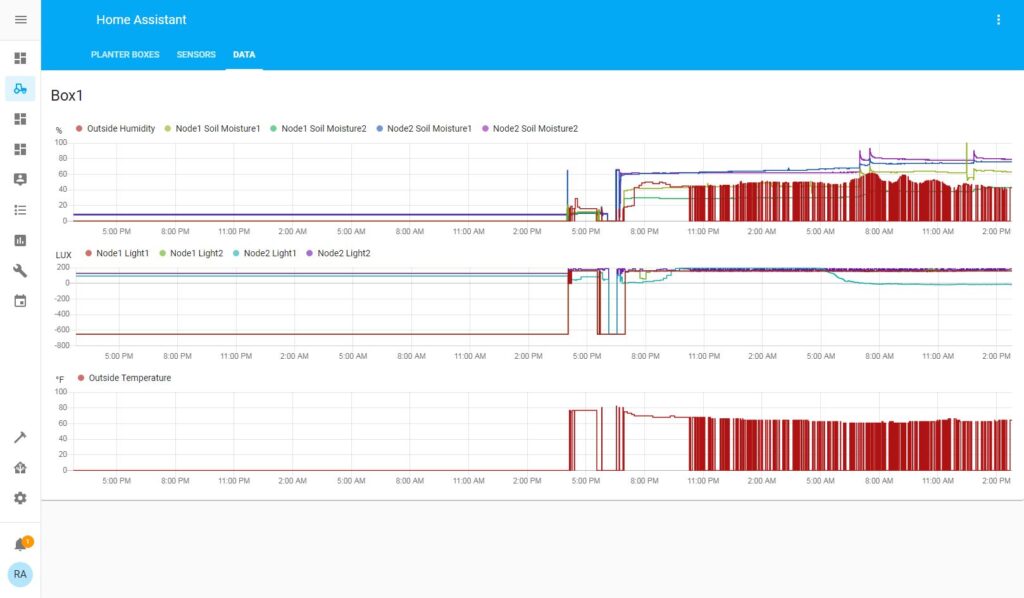
Now we get to a lovely display of data graphing that would make any researcher proud. The first graph compares the air humidity with the soil humidity for the last 48 hours so you can see how the day’s heat affects the soil moisture. If you look closely on the right side of this graph, you can see two spikes where the water pump did it’s thing. The next graph is for the light sensors, but I only have one connected right now. The last graph will show the soil temperature for each of the planter boxes as soon as I get those wired into the ESP8266.
Later I will be adding a water level sensor that tells me to fill the water tank and will not let the pump run if the water level gets below the pump’s intake level.
I am hoping to have more about this project later next week including how I built the electronics and 3D printed a solar radiation shield to get more accurate weather data.
Garden Data Logging with Adafruit IO
I threw together a sensor node to collect some more detailed soil moisture data in my planter boxes. This is using an ESP32 with 3 capacitive soil moisture sensors. I connected that to Adafruit IO to collect and graph the data.